Database Configuration Assistant (dbca) is an
Oracle provided tool to create a new database. In this document I would explain
how to create a new 12c R1 database using dbca. For database creation steps for Oracle 12c R2, follow this document. Steps and screens are almost same
for other Oracle database versions and different OS platforms.
1)
1)
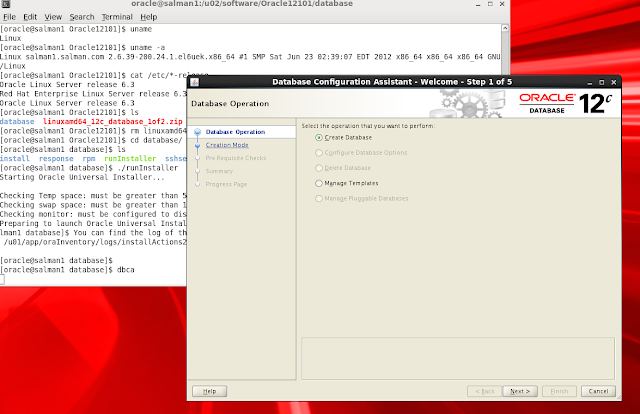
For Unix based platforms, log in as “oracle” user and initiate dbca by writing
“dbca” using command line. Make sure your environment variables are set
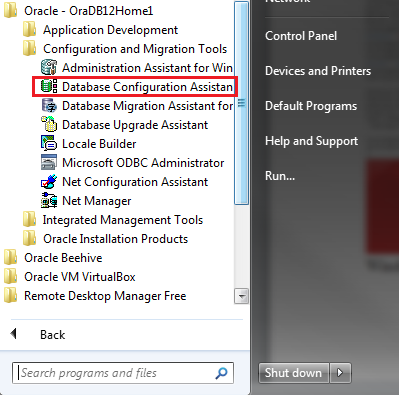
properly. For windows , initiate dbca from start menu.
For Windows, initiate from Start Menu
From first screen, select appropriate option of your choice. If this is the first database on the server, we only see 2 options enabled. For create a new database, we select “Create a Database” and click Next.
2)
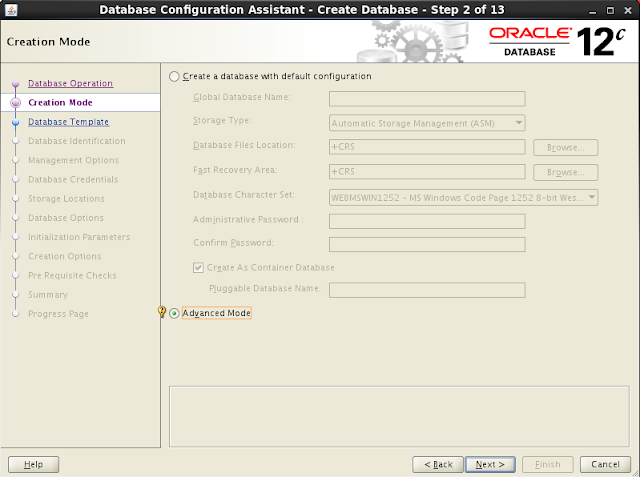
On seconds scree, I have selected “Advance” so that all steps could be explained. In 11g, you will not see this screen.


For Windows, initiate from Start Menu

From first screen, select appropriate option of your choice. If this is the first database on the server, we only see 2 options enabled. For create a new database, we select “Create a Database” and click Next.
2)
On seconds scree, I have selected “Advance” so that all steps could be explained. In 11g, you will not see this screen.

3)
Select database type you want to create. In Custom Database option, you would need to provide details of database options you want to install.
Select database type you want to create. In Custom Database option, you would need to provide details of database options you want to install.

4)
Provide database name and SID. Click the check box if you want to create this database as a container database (also provide pluggable database name with this), In 11g there is no “Create As Container Database” option on this screen.
Provide database name and SID. Click the check box if you want to create this database as a container database (also provide pluggable database name with this), In 11g there is no “Create As Container Database” option on this screen.

5)
Enterprise Manager Database Express can also be configured with database creation. Click Next.
Enterprise Manager Database Express can also be configured with database creation. Click Next.

6)
Provide passwords for admin users and click Next
Provide passwords for admin users and click Next

7)
If you already have Grid Infrastructure configured and listener is running, dbca would show currently running listener. You can click check box if you want to configure a listener from database home.
If you already have Grid Infrastructure configured and listener is running, dbca would show currently running listener. You can click check box if you want to configure a listener from database home.

8)
Select Automatic Storage Management (ASM) if you have a diskgroup created to store the database. Alternatively you can store database on file system. Also specify ASM or file system for Fast Recovery Area (optional)
Select Automatic Storage Management (ASM) if you have a diskgroup created to store the database. Alternatively you can store database on file system. Also specify ASM or file system for Fast Recovery Area (optional)

9)
Click Next
Click Next

10)
Specify SGA settings or alternatively you can select Automatic Memory Management. From Sizing tab, you can specify number of process and database block size (For Database option I selected in step 3 above, block size is 8192 and can not be changed from this screen). From character set tab, you may also change database and national characterset. Connection Mode tab gives you choice of selecting Dedicated Server or Shared Server mode for database connections. Click Next
Specify SGA settings or alternatively you can select Automatic Memory Management. From Sizing tab, you can specify number of process and database block size (For Database option I selected in step 3 above, block size is 8192 and can not be changed from this screen). From character set tab, you may also change database and national characterset. Connection Mode tab gives you choice of selecting Dedicated Server or Shared Server mode for database connections. Click Next

11)
Click Next. dbca would perform prerequisite checks on next step. Resolve any issue if dbca lists any.
Click Next. dbca would perform prerequisite checks on next step. Resolve any issue if dbca lists any.

12)
Click Finish.
Click Finish.

13)
Monitor the progress.
Monitor the progress.

14)
Click Exit, and then Close.
Click Exit, and then Close.

Database creation has completed successfully and ready to use.

thanks , good article .
ReplyDelete