You might be interested in
installing 12c R1 Grid Infrastructure (for a standalone server) software in order
to use ASM and/or Oracle Restart feature of GI. In the following I will explain
how to install GI for a standalone server on Linux 6. For this installation, I am
using OracleLinux 6. You might also want to check how to install Oracle 12c R1 GI on Linux 7
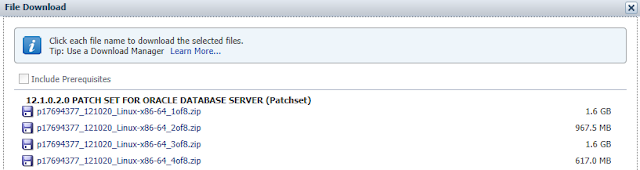
Download and unzip the software
Download 12c Grid Infrastructure and RDBMS softwares.
First release (12.1.0.1) can be downloaded from www.oracle.com, but since we are installing 12.1.0.2 here, we would need to download patch set 1769377. First 2 zip files are for database and last 2 are for Grid Infrastructure binaries.
8)
Add OS groups and “grid” user
9)
Edit /etc/security/limits.conf as user root and set limits.
10)
11)
As root user, add following lines in /etc/pam.d/login file if not present already
14)
15)
Add following in /home/<username>/.bash_profile file of grid user. At this point, we do no need to set other environment variables i.e. ORACLE_BASE or ORACLE_HOME.
16)
As grid user, extrac the binaries downloaded for GI. For this installation I extracted the binaries under /u02 directory.
Log in as grid user using Linux desktop or you may also use any X server software. Start installation
$ cd /u02/grid
$ ./runInstaller


29)
After successful execution of scripts, come back to installation screen and press OK on the dialogue box, Installer would continue to execute next step of installation. Once installation completes, press Close to exit installer.

Download and unzip the software
Download 12c Grid Infrastructure and RDBMS softwares.

1)
Make sure you have entries in the /etc/host file for the name resolution.
Make sure you have entries in the /etc/host file for the name resolution.
127.0.0.1
localhost localhost.localdomain localhost
192.231.231.40
salman1.salman.com salman1
|
2)
Edit /etc/selinux/config and set value for SELINUX to either “permissive” or “disabled”
Edit /etc/selinux/config and set value for SELINUX to either “permissive” or “disabled”
SELINUX=permissive
|
3)
As root user, configure Shared Memory File System. Add following line in /etc/fstab file for shared memory file system. Modify the value of “size” based on the amount of memory you will be using for your SGA
As root user, configure Shared Memory File System. Add following line in /etc/fstab file for shared memory file system. Modify the value of “size” based on the amount of memory you will be using for your SGA
tmpfs
/dev/shm
tmpfs rw,exec,size=8g 0
0
|
4)
Disable the firewall
Disable the firewall
[root@salman1 ~]#
service iptables stop
iptables: Flushing
firewall rules:
[ OK ]
iptables: Setting
chains to policy ACCEPT:
filter [ OK
]
iptables: Unloading
modules:
[
OK ]
[root@salman1 ~]#
chkconfig iptables off
|
5)
Reboot the host
Reboot the host
6)
We can perform automatic configuration of the server using “yum” command. If you want to do manual configuration, skip this step and go to next step (step 7).
Automatic configuration would perform following tasks
- Installation of required RPM packages
- Setup kernel parameters in /etc/sysctl.conf file
- Creation of OS groups (oinstall, dba) and OS user (oracle)
- Setting limits for installation user “oracle”
For Oracle Linux, follow the steps mentioned in the following documents to access the online yum repository.
http://public-yum.oracle.com/
[root@salman1 ~]# yum install
oracle-rdbms-server-12cR1-preinstall –y
|
As already mentioned, above command will
install all required packages which are needed for grid infrastructure and/or
RDBMS software installation. If you also plan to install a 32-bit client on
this x86_64 server, you would also need to install 32-bit version of these RPM
packages manually.
compat-libstdc++-33-3.2.3-69.el6.i686
glibc-2.12-1.7.el6 (i686) glibc-devel-2.12-1.7.el6.i686 libgcc-4.4.4-13.el6 (i686) libstdc++-4.4.4-13.el6.i686 libstdc++-devel-4.4.4-13.el6.i686 libaio-0.3.107-10.el6.i686 libaio-devel-0.3.107-10.el6.i686 libXext-1.1 (i686) libXtst-1.0.99.2 (i686) libX11-1.3 (i686) libXau-1.0.5 (i686) libxcb-1.5 (i686) libXi-1.3 (i686) make-3.81-19.el6 sysstat-9.0.4-11.el6 (x86_64) nfs-utils-1.2.3-15.0.1 |
If you want to install form Oracle Linux installation media, use “rpm
-i” command to install the packages.
If you have performed this step; skip next step and go to step 8 directly.
If you have performed this step; skip next step and go to step 8 directly.
Install following RPM
packages (or latest version) from either yum repository or from Linux 6 media
binutils-2.20.51.0.2-5.11.el6
(x86_64)
compat-libcap1-1.10-1
(x86_64)
compat-libstdc++-33-3.2.3-69.el6
(x86_64)
compat-libstdc++-33-3.2.3-69.el6.i686
gcc-4.4.4-13.el6
(x86_64)
gcc-c++-4.4.4-13.el6
(x86_64)
glibc-2.12-1.7.el6
(i686)
glibc-2.12-1.7.el6
(x86_64)
glibc-devel-2.12-1.7.el6
(x86_64)
glibc-devel-2.12-1.7.el6.i686
ksh
libgcc-4.4.4-13.el6
(i686)
libgcc-4.4.4-13.el6
(x86_64)
libstdc++-4.4.4-13.el6
(x86_64)
libstdc++-4.4.4-13.el6.i686
libstdc++-devel-4.4.4-13.el6
(x86_64)
libstdc++-devel-4.4.4-13.el6.i686
libaio-0.3.107-10.el6
(x86_64)
libaio-0.3.107-10.el6.i686
libaio-devel-0.3.107-10.el6
(x86_64)
libaio-devel-0.3.107-10.el6.i686
libXext-1.1 (x86_64)
libXext-1.1 (i686)
libXtst-1.0.99.2
(x86_64)
libXtst-1.0.99.2
(i686)
libX11-1.3 (x86_64)
libX11-1.3 (i686)
libXau-1.0.5
(x86_64)
libXau-1.0.5 (i686)
libxcb-1.5 (x86_64)
libxcb-1.5 (i686)
libXi-1.3 (x86_64)
libXi-1.3 (i686)
make-3.81-19.el6
sysstat-9.0.4-11.el6
(x86_64)
nfs-utils-1.2.3-15.0.1
unixODBC
Example (yum)
[root@salman1 ~]# yum install glibc
Example (Linux
Media)
[root@salman1 ~]#
rpm -i glibc
Example (Check after
install)
[root@salman1 ~]#
rpm -q glibc
glibc-2.17-55.el7.x86_64
|
Edit /etc/sysctl.conf
add following entries to set kernel parameters
fs.file-max =
6815744
kernel.sem = 250
32000 100 128
kernel.shmmni = 4096
kernel.shmall =
4294967296
kernel.shmmax =
4398046511104
kernel.panic_on_oops
= 1
net.core.rmem_default
= 262144
net.core.rmem_max =
4194304
net.core.wmem_default
= 262144
net.core.wmem_max =
1048576
fs.aio-max-nr =
1048576
net.ipv4.ip_local_port_range
= 9000 65500
|
Execute following
command after adding above lines so that new values in /etc/sysctl.conf file
could take effect.
/sbin/sysctl -p
|
8)
Add OS groups and “grid” user
Add groups
[root@salman1 ~]# groupadd -g 54325 asmdba [root@salman1 ~]# groupadd -g 54328 asmadmin [root@salman1 ~]# groupadd -g 54329 asmoper
Add user
[root@salman1 ~]# useradd -u 54322 -g oinstall -G dba,asmdba,asmadmin,asmoper grid
Set passwords for the grid user
[root@salman1 ~]# passwd grid |
9)
Edit /etc/security/limits.conf as user root and set limits.
grid soft nofile 1024
grid hard nofile 65536 grid soft nproc 16384 grid hard nproc 16384 grid soft stack 10240 grid hard stack 32768 grid hard memlock 134217728 grid soft memlock 134217728 |
10)
Install oracleasm-support and oracleasmlib,
and then configure oracleasm.
oracleasm kernel driver is built in Oracle Linux and does not need to be installed. After installing oracleasm-support and oracleasmlib packages, oracleasm driver starts working.
oracleasm kernel driver is built in Oracle Linux and does not need to be installed. After installing oracleasm-support and oracleasmlib packages, oracleasm driver starts working.
If you are using some other flavor of Linux,
for example RedHat Linux, then you would need to install all 3 packages
(oracleasm driver, oracleasm-support and oracleasmlib).
As root, install oracleasm-support from yum repository or from Linux media, then download oracleasmlib package form the following URL, and install.
http://www.oracle.com/technetwork/server-storage/linux/asmlib/ol6-1709075.html
As root, install oracleasm-support from yum repository or from Linux media, then download oracleasmlib package form the following URL, and install.
http://www.oracle.com/technetwork/server-storage/linux/asmlib/ol6-1709075.html
Install oracleasmlib
and oracleasm-support
[root@salman1 ~]# yum install oracleasm-support [root@salman1 ~]# rpm -i oracleasm-lib*
Configure oracleasm
(highlighted in red are the inputs during configuration)
[root@salman1 ~]# /etc/init.d/oracleasm configure
Configuring the Oracle ASM library driver. This will configure the on-boot properties of the Oracle ASM library driver. The following questions will determine whether the driver is loaded on boot and what permissions it will have. The current values will be shown in brackets ('[]'). Hitting <ENTER> without typing an answer will keep that current value. Ctrl-C will abort.
Default user to own the driver interface []: grid
Default group to own the driver interface []: asmadmin Scan for Oracle ASM disks on boot (y/n) [y]:y Writing Oracle ASM library driver configuration: done Initializing the Oracle ASMLib driver: [ OK ] Scanning the system for Oracle ASMLib disks: [ OK ]
Check Configuration
[root@salman1 ~]# /usr/sbin/oracleasm configure
ORACLEASM_UID=grid ORACLEASM_GID=asmadmin ORACLEASM_SCANBOOT=true ORACLEASM_SCANORDER="" ORACLEASM_SCANEXCLUDE="" ORACLEASM_USE_LOGICAL_BLOCK_SIZE="false" |
11)
As root user, add following lines in /etc/pam.d/login file if not present already
session required /lib64/security/pam_limits.so session required pam_limits.so |
12)
As root, partition your disks that you will be using for CRS and other file diskgroups (to be used later for database) and create ASM disks using oracleASMLib. Following document explains how to do this.
CreatingASM disks using ASMLib
For this installation, I have created 3 ASM disks, CRS1, CRS2 and CRS3 which I will use for CRS diskgroup to store OCR
13)
As root, create directories and change ownership to grid user.
As root, create directories and change ownership to grid user.
[root@salman1 ~]# mkdir
-p /u01/app/12.1.0/grid
[root@salman1 ~]# mkdir -p /u01/app/grid [root@salman1 ~]# chown -R grid:oinstall /u01 |
14)
Add
IO scheduler for ASM disks. Modify highlighted disks names to match your
environment as you may have different disks/paths.
[root@salman1 ~]# echo
deadline > /sys/block/sdb/queue/scheduler
[root@salman1 ~]# echo deadline > /sys/block/sdc/queue/scheduler [root@salman1 ~]# echo deadline > /sys/block/sdd/queue/scheduler |
15)
Add following in /home/<username>/.bash_profile file of grid user. At this point, we do no need to set other environment variables i.e. ORACLE_BASE or ORACLE_HOME.
umask 022 |
16)
As grid user, extrac the binaries downloaded for GI. For this installation I extracted the binaries under /u02 directory.
Log in as grid user using Linux desktop or you may also use any X server software. Start installation
$ cd /u02/grid
$ ./runInstaller
17)
Select second option for installing GI for standalone server
Select second option for installing GI for standalone server

18)
Click Next
Click Next

19)
Select disks and provide name for ASM diskgroup to store OCR. I have selected 3 ASM disks which are mentioned in step 12 above.
Select disks and provide name for ASM diskgroup to store OCR. I have selected 3 ASM disks which are mentioned in step 12 above.

20)
Enter passwords for SYS password
Enter passwords for SYS password

21)
Click Next
Click Next

22)
OS groups are already selected on this screen.
OS groups are already selected on this screen.

23)
Provide oracle base and oracle home directories locations.
Provide oracle base and oracle home directories locations.

24)
Click Next.
Click Next.

25)
Click Next. After this screen Prerequisite Check screen will come and will automatically move to next screen if no problems found. If Prerequisites Check screen stops and displays some issue, resolve that before moving forward.
Click Next. After this screen Prerequisite Check screen will come and will automatically move to next screen if no problems found. If Prerequisites Check screen stops and displays some issue, resolve that before moving forward.

26)
Click Next.
Click Next.

27)
Monitor the installation progress.
Monitor the installation progress.

28)
Log in as root from a terminal windows and execute the scripts one by one as mentioned in the following screen. Click OK after executing both scripts.
Log in as root from a terminal windows and execute the scripts one by one as mentioned in the following screen. Click OK after executing both scripts.

After running above
script, output should be as follows.
[root@salman1
u01]# /u01/app/oraInventory/orainstRoot.sh
Changing permissions of /u01/app/oraInventory.
Adding read,write permissions for group.
Removing read,write,execute permissions for world.
Changing groupname of /u01/app/oraInventory to
oinstall.
The execution of the script is complete.
[root@salman1 u01]# /u01/app/grid/product/12.1.0/grid/root.sh
Performing root user operation.
The following environment variables are set as:
ORACLE_OWNER= grid
ORACLE_HOME=
/u01/app/grid/product/12.1.0/grid
Enter the full pathname of the local bin
directory: [/usr/local/bin]:
Copying
dbhome to /usr/local/bin ...
Copying
oraenv to /usr/local/bin ...
Copying
coraenv to /usr/local/bin ...
Creating /etc/oratab file...
Entries will be added to the /etc/oratab file as
needed by
Database Configuration Assistant when a database
is created
Finished running generic part of root script.
Now product-specific root actions will be
performed.
Using configuration parameter file:
/u01/app/grid/product/12.1.0/grid/crs/install/crsconfig_params
LOCAL ADD MODE
Creating OCR keys for user 'grid', privgrp
'oinstall'..
Operation successful.
LOCAL ONLY MODE
Successfully accumulated necessary OCR keys.
Creating OCR keys for user 'root', privgrp
'root'..
Operation successful.
CRS-4664: Node salman1 successfully pinned.
2016/05/06 17:27:26 CLSRSC-330: Adding Clusterware
entries to file 'oracle-ohasd.conf'
salman1
2016/05/06 17:27:44
/u01/app/grid/product/12.1.0/grid/cdata/salman1/backup_20160506_172744.olr 0
CRS-2791: Starting shutdown of Oracle High
Availability Services-managed resources on 'salman1'
CRS-2673: Attempting to stop 'ora.evmd' on
'salman1'
CRS-2677: Stop of 'ora.evmd' on 'salman1'
succeeded
CRS-2793: Shutdown of Oracle High Availability
Services-managed resources on 'salman1' has completed
CRS-4133: Oracle High Availability Services has
been stopped.
CRS-4123: Oracle High Availability Services has
been started.
2016/05/06 17:28:48 CLSRSC-327: Successfully
configured Oracle Restart for a standalone server
|
29)
After successful execution of scripts, come back to installation screen and press OK on the dialogue box, Installer would continue to execute next step of installation. Once installation completes, press Close to exit installer.

30)
Check status of GI services.
Check status of GI services.
[grid@salman1 database]$ crsctl stat res –t
--------------------------------------------------------------------------------
Name
Target State Server State details
--------------------------------------------------------------------------------
Local Resources
--------------------------------------------------------------------------------
ora.CRS.dg
ONLINE ONLINE salman1 STABLE
ora.LISTENER.lsnr
ONLINE ONLINE salman1 STABLE
ora.asm
ONLINE ONLINE salman1 Started,STABLE
ora.ons
OFFLINE OFFLINE
salman1 STABLE
--------------------------------------------------------------------------------
Cluster Resources
--------------------------------------------------------------------------------
ora.cssd
1 ONLINE ONLINE
salman1 STABLE
ora.diskmon
1 OFFLINE OFFLINE STABLE
ora.evmd
1 ONLINE
ONLINE salman1 STABLE
--------------------------------------------------------------------------------
|

No comments:
Post a Comment